(article continued from previous page)
From the moment I saw the plastic canister that holds the Roboriders Lego pieces, I knew the canister was destined to become a robot body. However, I didn’t foresee the difficulty of machining parts to mate with the tapered molded cylinder. And, I didn’t remember from the Sandwich days how difficult it is to machine a thin plastic container.


Left: Lego Technic Roborider packaging canister 8514. Right: End mill fails to cleanly cut thin plastic.
When attempting to machine the motor axle slot in the robot body, the canister’s soft, slippery, thin plastic simply buckled and pushed away from the end mill blades. I tried speeding up the milling machine to almost 2800 RPM or slowing it down to 150 RPM. I tried two-flute end mills and four-flute end mills. (I don’t own a roughing end mill or six-flute end mill in a 5/8-inch diameter.)

Stuffing a plastic canister with paper towels and grinding the sides.
Referring to the numbers in the above picture:

Making slits for the flat motor cables using a Dremel with a cut-off wheel.
Notice how crisp and clean the axle hole is after grinding, compared to the stringy and misshapen hole that milling produced.
Now that I remembered to machine thin plastic with grinding tools, the slits for the flexible flat cables (FFC) for the Maxon motor are made with Dremel cut-off discs. This procedure can be performed by hand, while manually holding onto the canister.

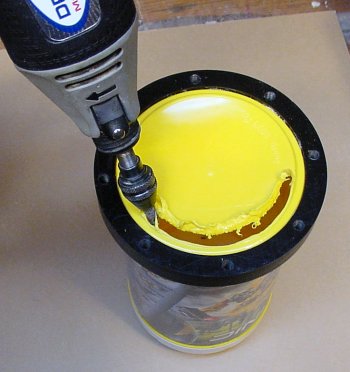
Grinding off the end of the yellow plastic canister.
The end of the Lego canister has remained intact up until this point to keep the container as rigid as possible during machining. The final step is to remove the end with a rotary tool grinding stone bit.
Despite trying different speeds, the plastic is actually melting more than being ground off. A rougher grit size is required to truly grind the plastic, but I can’t find any such a Dremel accessory in a narrow diameter.
Allow the plastic to cool and then pick off the rough parts by hand or cut them off with an Xacto knife. Because the edge is hidden by the lip of the acrylic dome, it isn’t vital to make it perfect.
The acrylic dome (#G15338) can be purchased from Electronic Goldmine for $2.50. It is very high quality -- easy to see through yet a hearty 4 mm thick (0.1575″).

Locating the origin of the vise before drilling bolt holes for a clear plastic dome.
The dome features a 1/2-inch flat lip (a flange) that is appropriate for attaching the dome by adhesive or for drilling bolt holes. Because acrylic is brittle, it is best to drill clearance holes for bolts to clamp down the dome rather than attempting to add threads for screws.
My milling machine has a digital read out. I can use a light-up indicator to find the upper-left corner of the vise and zero the read-out origin. The appropriate diameter drill is inserted (No.9 for #10-32 clearance holes) and the milling-machine table is moved to each of the coordinates on the technical drawing. If your milling machine doesn’t have a digital readout, then print out a template and tape it to the dome flange.
To make evenly-spaced holes within a large circle in a technical drawing on a computer:
Alternatively, another method is:

Finished clear acrylic plastic dome with eight bolt holes.
Acrylic cracks if stressed or machined too close to an edge. Acrylic also melts if machined or drilled with too high of an RPM or if the plastic chips aren’t removed often enough. In fact, the flutes of the drill or end mill can easily become packed with a plastic clog.
Therefore, drill slowly enough to not stress the material but not so slowly that the bit simply sits there producing heat from friction. Pull out often to clear out plastic residue. And, pull out and pause to give the end mill or drill time to cool off (believe it or not, you can burn yourself on the overly hot drill bit).
The acrylic was properly machined if the hole has sharp, clean edges. But, if the edges are wavy from melting, or have become bonded with plastic nodules, then too much heat has built up. A few of the holes in my acrylic dome suffered from some roughness due to melted chips, but the bumps were removed with a gentle touch of a Dremel rubber abrasive bit.

Clear plastic dome bolted onto a black plastic collar to protect a wireless video camera and other electronics.
The finished dome fits very nicely on the black plastic collar. One bolt hole was slightly out of alignment because the dome needed to be rotated in the vise due to the limited y-travel of my small milling machine. Enlarging that hole with the next diameter drill size corrected the problem without being visible underneath the socket-head fastener.