

About six months prior, I made a pathetic Robot Sumo ring. Still, every failure is just a way of learning how not to make something. By following the revised steps detailed below, the new rings turned out great -- competition quality!
Robot Sumo has two popular ring sizes. The mini-sumo ring is easier to build, less expensive, and small enough and light enough to transport in an ordinary car. See The Illustrated Guide To American Robot Sumo for complete ring dimensions.
There’s usually a large selection of board material available at local hardware stores. Select a substance that:

Medium density fiberboard
I chose a MDF (medium-density fiberboard) that was 4-feet by 8-feet and 5/8-inches thick. It cost $13. The store cut the board (for free) into thirds (4-feet by 2.66-feet) so that I could transport it home without a truck.
Plywood or particleboard would have been acceptable alternatives. Plywood is a little more rugged, but not as smooth or workable.
Although I originally just wanted a single 3-ft x 3-ft board, the cost was the same whether I kept all the pieces or not. And since I was going through all the setup work anyway, I ended up making three rings at the same time.
Making a precise circle can be daunting. It turns out there’s a simple, inexpensive tool that makes it a breeze. MicroMark item number #14302 is a yardstick compass. It costs about $6 (Ouch! Now it’s $13.80). A yardstick is required.
This tool (homemade or store bought) is one of the most important secrets to making a good sumo board. Don’t try it without this!


Left: Yardstick compass trammel with point. Right: Yardstick compass trammel with graphite.
Place the pointy trammel (metal tube thing) on one end of the yardstick. To prevent it from falling off, try the 1 cm mark.
Place the graphite pencil trammel (other metal tube thing) at the distance away that you want the circle radius to be. To make a mini-sumo board, with the pointy trammel set to 1 cm, set the pencil tramel to the 39.5 cm mark.
			39.5 cm end - 1 cm start = 38.5 cm

			38.5 cm radius * 2 = 77 cm diameter
At the center of the board, push the pointed tip into the wood slightly. Then rotate the graphite end around. A precise and even circle is drawn on the board. MicroMark has a nice picture of this tool in action.
Don’t cut the board until you’ve used a ruler to double check that the diameter measures 77 cm.

Jigsaw
Because the ring shape doesn’t have any straight lines, a jigsaw is a good choice for cutting. Better tools are pivoting bandsaws or circle attachments for jigsaws. If you take your time and follow the marked circle carefully, you'll be rewarded with a beautiful shape.

Smooth cut scroll blade
Use a fine wood blade (like Vermont-American #30016 smooth scroll cut) and a short orbit.
A coarse wood blade has larger, splayed teeth. This results in a faster cut, but with more waste, less accuracy, and rougher edges.
A full orbit on the jigsaw causes more wood to be cut with each stroke, but makes turning more difficult and curves more ragged.

Finished circle with four pieces cut off along the way
Don’t try to be Wile E. Coyote and cut out the whole circle in one complete pass. Along the way, cut off segments of the outer board. This prevents the board from stressing, jamming the blade, or breaking off.
Hand sand the edge of the board with coarse grit sandpaper. This evens out small deviations in the ring roundness. It also creates a slightly-rounded edge, which is nice when carrying or positioning the ring.

Coarse and fine grit sandpaper
Follow up with a fine grit sandpaper to remove the saw and sandpaper patterns from the edge. This gives the ring a professional appearance and smooth feel.
The top and bottom surface of the ring don’t need to be sanded unless the board has a glossy surface. A glossy coating might not hold the paint well unless it’s roughed up a bit at the microscopic level.
After sanding, clean the entire board with soap and water. Only use a damp sponge, since fiberboard and other wood-based materials warp if too much water is applied.

Damp sponge to remove sawdust and grime
The idea is to remove the sawdust and any other surface grime without soaking the wood.
After cleaning, let the board dry out completely. If you fail to clean the board or don’t allow it to dry, the paint won’t adhere properly.

Three rings ready for painting
Find a sheltered location away from wind and falling debris, but that has plenty of ventilation. For me, the garage was suitable.
Use drop cloths to protect the floor and move everything else far away. You’d be surprised how far spray-paint particles travel.
Unless you’re a very good painter, you'll want to avoid brush-on paint. Since the paint is less even, it tends to pool and leave small ridges that a Sumo scoop will scrape or get caught on.
Place the board such that the top has the small pin indentation that marked the center when the yardstick compass was used to draw the circle. Although the center indentation will cover over slightly during painting, it’s vital to have this reference point in later steps.
Spray the entire top of the ring flat black. This surface is intended to be as non-reflective as possible. I’ve heard that polyurethane paint has been recommended, but enamel seemed to work better for me. Use several coats, as the board is subjected to scraps and scuffs during battle.
Adjust the yardstick compass down 2.5 cm (1 inch). Locate the original center of the ring, and faintly draw a circle on the top of the dry, painted board. The smaller circle should now perfectly mark the 2.5 cm border that will be painted glossy white. Use a ruler in various locations to check that the border isn’t off center or less than 2.5 cm.


Left: Inner border completely masked. Right: Close-up of tape and border.
Use fresh, narrow, blue (low stick / easy release) masking tape to protect the inner edge of the ring. It’s a chore to slowly bend and turn the tape around the board. But, the circle helps guide you, and the mask makes for a gorgeous edge after painting.
Be sure to firmly press down the tape at the edges or else spray paint creeps under. Pay special attention to rubbing down any spots where you might have torn off a strip of tape and overlapped a new piece. Although the tape is vital to producing a clean edge, it isn’t effective at stopping pools of paint, which can bleed under.
It may seem impossible until you try, but masking a curve isn’t as difficult as it seems. In fact, after a while, your hands get into a pattern of laying out long strips in a flowing arc. Since the tape is easy to remove, you can rework a portion if the taped curve appears blocky or stepped.

Newspaper masking middle of ring
Use newspaper (or whatever) to cover the remainder of the middle of the board. The paper can be cut to shape by first drawing a circle on it with the yardstick compass.
Unless all edges of the paper are securely taped down, the force of the spray from the paint propellant lifts the paper and spoils the board with droplets. If fact, during a second coat, the old white masking tape I had used lost its stick. The opening nearly provided an entrance for the white mist.
Paint the border glossy white. This is intended to provide as much reflectivity as possible, so that the robot will recognize the edge of the ring (and hopefully not fall off).
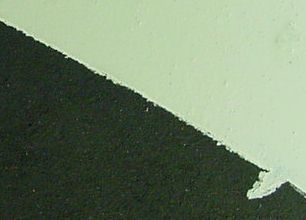
Close-up of border with a slight defect
The blue tape and newspaper did their job well. The white border crisply transitions to black. In the above extreme close up, a bit of bleed-through can be seen. A prominent triangular bleed-through resulted from a failure to firmly rub an overlap between pieces of tape.
By being more careful to press the tape edge (multiple times), the second and third boards turned out even better. No significant bleed-throughs, droplets, or other defects appeared.


Left: Paper stencil for starting lines. Right: Starting lines masked with tape and paper.
To make the starting lines, measure and draw two parallel 10-cm (3.93-inch) long lines of 1-cm (slightly more than 3/8-inch) thickness. The lines are each 5 cm (1.97 inches) away from the center.
I made a paper stencil using Visio, which I then converted to Adobe Reader PDF:
After printing and cutting out the starting lines from the paper, I used the compass’s center pinhole to position the paper exactly in the middle of the ring. I then traced the lines using a pencil.
After marking the location for the lines, use tape to cover the board around the lines. The tape makes very straight lines. Be sure to rub down the edges of the tape to prevent paint from leaking under.
Cover the remainder of the board with newspaper, and tape the newspaper in place.
Spray the exposed area with brown paint. A single, light coat should be fine. After a minute of drying, I pulled the paper and mask off so that the painted lines would be less likely to form a raised edge that could be scooped off.
After allowing the ring to dry overnight, I tested it with my Sumo robot, Bugdozer. The robot’s aggressive scoop kept jumping and popping on the rough surface. What appeared to be smooth to me was nasty to the robot.

Fine steel wool
My wife suggested lightly buffing the surface with fine steel wool. (Don’t use the coarse steel wool or fine sandpaper -- they both scratch).

Ring showing a few passes of steel wool
The fine steel wool worked really well! After cleaning with a damp sponge, the surface was smooth, even, and scratch free.

Finished mini-Sumo ring
I finished three mini-Sumo rings in a weekend. They all turned out professional looking and the robots run well on them.
The board stiffness allows the ring to be placed on scrap wood or bricks so that the ring is at the proper height. The paint is even, crisp, and distinct. The cost of raw materials was less than $10 a board. (However, labor was considerable.)
Now that you know the steps, tools, and materials, making your own Robot Sumo ring won’t be so hard. Why not make a bunch with your local club or organization?