(Continued from previous page)
The safe-sync connects a low-voltage camera hot shoe, such as those on modern digital cameras, to a higher-voltage external flash or studio strobe. I implemented my safe-sync circuit on a portion of Wright Hobbies Robotics Protoboard 400, because it is a double-sided breadboard with buses and plated holes that make connections with fewer point-to-point wires.

Safe-sync circuit on protoboard.
I would have laid it out nicely on a printed circuit board, but my brother needed one quickly. Hence, the model is named the “BroSync” in homage to the earlier BroMatic 2000 counter project.
The labels are simply envelope stickers printed on a color laser printer.
The screw-based wire connectors are acceptable under the circumstances. But, I would have preferred more professional posts with plastic thumbscrews, because wires wrapped around the posts are less likely to slip out. Even nicer would have been a PC cord socket compatible with his camera.
Because of the potentially high voltage from the flash, this project should be installed in a project case. Not only will this reduce the likelihood of a person or camera being shocked, but it will also protect the project components from damage should the wiring or underside of the board come in contact with a conductive surface.
Another potential improvement would be a switch to enable a pair of resistors in parallel with R4 and R5. This would shorten recharge cycle time in exchange for a reduced voltage limit.
The old cheap external flash that I was complaining about on the previous page gave up its life to become the hot shoe connector for the safe sync. The hot shoe connector has wires soldered to it. The wires are inserted into the screw sockets on the safe-sync circuit board.


Left: Hot shoe connection removed from external flash. Right: Attached to digital camera.
An alternative approach would be to add a photosensor and microcontroller to the safe-sync circuit board, and have it trigger when the flash from the digital camera is sensed.

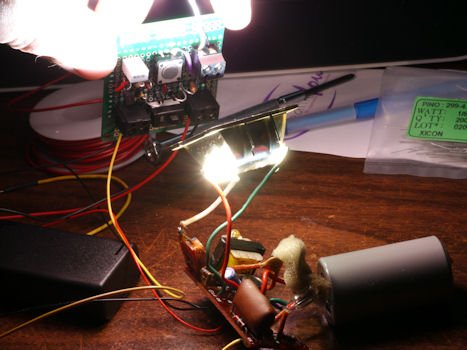
Gutted flash lighting up DIY safe sync.
Although it is hardly the best photo I’ve ever taken, the remains of the old flash light up one last image triggered by the wires leading to the digital camera. If I had understood the historical significance of such a photo, I might have cleaned up my desk a little bit. ☺
In learning about flash photography, I was surprised that exact timing isn’t necessary for most shutter speeds. I assumed that the flash needed to fire and stay bright while the shutter opened and closed. I anticipated that the tiniest delay in my circuit would ruin a photograph.
In fact, the shutter can be open for an eternity compared to the moment in time that the flash illuminates the subject. Furthermore, multiple flashes may occur at different times while the shutter is open. Each adds to the exposure of the film or charge of the digital pixels. Compared to the carefully orchestrated nanosecond timing of digital electronics, there’s something friendlier about the leisurely pace of the camera.
I hope my contribution makes the rounds on the photo enthusiasts’ forums. As always, I am interested in feedback, suggestions, and improvements.