

(continued from previous page)
In macro photography of small parts, the parts often need to sit flat on a table. Sometimes it doesn’t matter if the camera shoots the part at an angle. But other times, such as when I’m trying to photograph a solderless breadboard layout, I need the camera to be directly overhead.
There are some very nice tripod horizontal mounts with ball joint mounts and sometimes counterbalances. However, I really just needed something simple and short.

Tripod extension made from aluminum rod.
(See the Robot Room macro photography setup, presented earlier in this article, to see another view of the extension rod.)
The camera-mount tripod extension is made from a 6-inch long, 5/8-inch diameter, solid aluminum rod. This material was selected because:
I chose a round material because it is a natural choice for creating centered holes on a lathe. But, there’s no reason that the mount extension couldn’t be made from a rectangular or odd-shaped piece, so long as the ends are flat. In that case, you might just drill the holes using a standard drill.

Cut off a 6-inch length of rod with a hacksaw. Face the rough end flat on the lathe.
Chamfer the end to avoid sharp edges cutting into the camera or the tripod mount.
Create a starting hole with a center drill or countersink. This is standard practice for making sure the deeper cutting drill is perfectly centered in the workpiece.
A smaller size drill goes in first. The hole is cleaned out and then a #7 makes the final diameter.
Chamfer the hole with a countersink. Finally, lightly face the end again to remove any burrs or tiny ridges created during machining. This ensures that the entire surface is reasonably flat, to reduce scratching of the camera or tripod mount.
The process is repeated for the other end of the rod.
Most modern cameras and tripods have screws and threaded holes for 1/4-20 bolts. The “1/4” refers to the screw diameter and the “20” refers to the number of threads per inch.
This is common screw size, so obtaining screws, nuts, and tools is easy. In fact, you can find them in almost any hardware store.
Using some tapping fluid (such as Tap Magic) for lubrication, with the rod held firmly in place, use a 1/4-20 taper or plug tap to start threading the holes.

Tap magic tapping rod.
If you didn’t drill the holes deeply enough, clean them out and use a bottom tap to put threads all the way to the bottom of the hole.
Notice below that I used a v-groove block to hold the rod in place in the vise. If this were a presentation piece, I would have used another v-groove block or very thin sheet of brass on the opposite side to prevent the vise teeth from marring the rod.
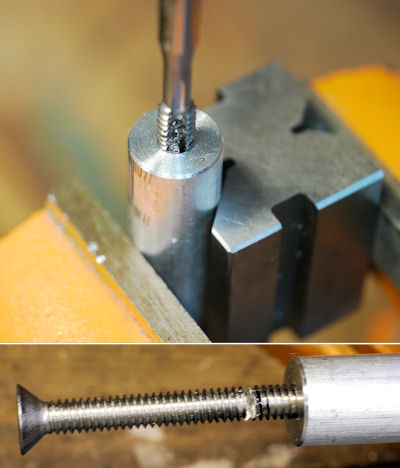
Tap rod in v-block and cut screw.
To make the threaded end, I inserted a 1/4-20 screw into one end of the aluminum rod and cut it off with a hacksaw so that about 1/3 of an inch remained. The crude end of the screw was then tapered with a grinder and the threads were cleaned with a 1/4-20 die. Just to be safe, I reversed the screw so that the factory end faced out to the camera.
Alternatively, instead of machining a screw, you can order a 1/4-20 set screw of the desired length (such as 5/8 inch length #90251A539 from McMaster-Carr).

Rod with threaded hole on one end and screw on the other end.
I’ve changed my mind. A steel or stainless-steel screw will slowly wear down the threads on the camera base. The screw is easily replaced, but the camera is not. So, I swapped in a brass screw.

Brass screw to wear rather than camera.
If desired, you can affix the screw in place using thread lock or epoxy.
The result is a strong, but lightweight, aluminum rod with a 1/4-20 threaded hole on one end and about a 0.250 inch protrusion of a 1/4-20 stainless steel threaded rod on the other end. The threaded part screws on to the base of the camera. Then, the end with the hole is attached to the tripod mount.
This isn’t adjustable like most commercial tripod extensions, but it is all I really need for macro shots.
It bears repeating that you don’t have to own a fancy camera to take good macro shots. After all, my old compact camera took many good pictures. In fact, because I don’t want to take the time to set up a tripod shot during most machining, I'll continue to use my compact Sony for machining photography for as long as the camera continues to operate.
With a remote shutter, tripod mount, and semi-professional camera, I’m looking forward to improving the quality of my work. But, I recognize that photography is a life-long learning process and passion. Particularly with macro photography, you have to be patient, experimental, and take a lot of extra shots.