(article continued from previous page)
The output of a 74AC14 inverter chip charges and discharges the capacitor (C2) through two different variable resistor paths to create pulse-width modulation. Hooking up an oscilloscope to the capacitor and to the output pin of the inverter chip reveals the operation of the PWM over time.
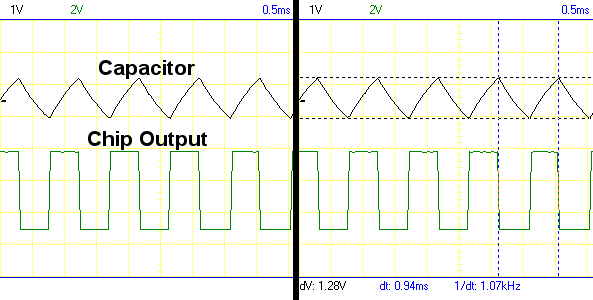
The first trace is a snapshot taken when the potentiometer wiper is centered evenly. Because the same approximate amount of resistance is used for both the charge and discharge paths, the on time and off time is about the same.

Oscilloscope trace of a triangular charge-discharge cycle of a capacitor and the square wave output of the connected logic chip.
The top row shows an almost triangle-shaped wave. There’s actually a bit of a curve to the triangle lines. This is the output of the capacitor charging (up slope) and discharging (down slope).
By the way, if you ever need a triangular wave, you now know how to make one.
The height of the triangle is about 1.28V. That is, the difference in voltage between the low state of the capacitor and the high state of the capacitor is around 1.28V. This amount is determined by the hysteresis of the Schmitt-trigger input.
The actual hysteresis (voltage difference) will vary from chip-to-chip, from technology-to-technology (AC versus HC or LV), by power supply voltage, and by temperature. Also, the true capacitance and resistance of the components will differ slightly from their labels. For these reasons, you cannot pre-determine an exact frequency of the pulse wave simply by the part numbers and part labels used in the circuit. However, you can come close enough for most purposes.
For example, a 0.1 µF (microfarad) capacitor and 10 kΩ (kilohm) potentiometer resulted in an approximately 1.07 kHz (kilohertz) frequency wave on my setup. If I swapped with other 0.1 µF capacitors from my part bin, or if I let the board age or tried it under different temperatures, the frequency might vary between 1.00 to 1.14 kHz. But, practically speaking, that won’t make a difference to the attached circuits.
The bottom row of the oscilloscope trace shows the square wave output of the inverter chip. When the output is high, the square wave is high, and the triangle wave slopes upwards because the output is charging the capacitor.
Notice that the output changes from high-to-low at the peak of the triangle wave and low-to-high at the valley of the triangle wave. At those points, the capacitor reached a high enough voltage or a low enough voltage to change the input value on the inverter chip, which caused the inverter chip to change its output.
The square wave is low about the same amount of time (the same width) as it is high. This is called 50% duty cycle. An attached device would receive about 50% power as it is only being turned on about half the time.
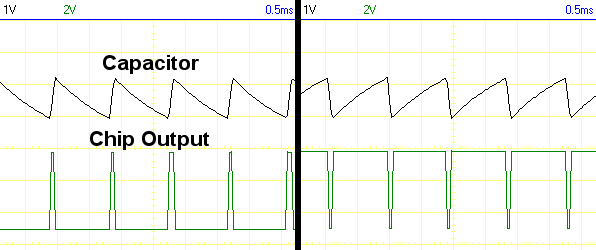
The second trace is a combined snapshot taken when the potentiometer wiper is first turned mostly left and then turned mostly right.

Oscilloscope trace of a saw tooth charge-discharge cycle of a capacitor and the variable-width square wave output of the connected logic chip.
The top row shows the capacitor voltage. Because the resistance for charging is now different than discharging, the shape of the wave is no longer symmetrical. Instead of a triangle, it looks more like the edge of a saw. This is a sawtooth wave.
By the way, if you ever need a sawtooth wave, you now know how to make one.
When the potentiometer wiper is turned to the left, the resistance of the left path is lowered. The lower resistance allows the capacitor to charge up more quickly. Therefore, the “on time” is shorter.
Now here’s to cool part of the trick. Because only one variable resistor is used in the circuit, the remaining resistance is given to the other path. That is, when the left path is less resistant, the right path is more resistant. The total resistance (and therefore the total frequency) is always the same -- only the division between the “on” path and the “off” path actually changes.
So, on a 10 kilohm potentiometer, when the left side is dialed to have 2 kilohm, the right side has 8 kilohm. When the right side is dialed to have 3 kilohm, the left side has 7 kilohm.
Dialing the potentiometer to the left and the right changes the ratio of “on time” to “off time”, but the total time stays the same. The ratio of “on time” to “off time” is called the “duty cycle”.
Compare the lower left square wave to the lower right square wave in the oscilloscope trace. The lower left maybe delivers 10% power since the high portion of the wave (the “on time”) appears 10% of the time. The lower right maybe delivers 90% power since the high portion of the wave (the “on time”) appears 90% of the time.
Ta da! You can now vary the power supplied to an attached device from almost 0% to almost 100%!
(Why not exactly 0% or exactly 100%? Even if the potentiometer is dialed to 0 ohms for charging and 10 kilohms for discharging, eventually the capacitor will discharge through the 10 kilohm path. It will then charge up again almost instantly through the 0 ohm path. But, still, there will be a tiny amount of time taken to charge up. So, it is not possible to be fully off or fully on with this circuit. For most applications, it doesn’t matter.)
It is now time to put this circuit to use with a motor driver...